Slow website loading, random “DNS server not responding” errors, or unreliable browsing are often caused by the DNS resolver assigned by your ISP. Switching to a faster public DNS provider usually takes less than two minutes and requires no extra software.
Most people searching for how to change DNS server Windows 11 want a quick fix that actually works without digging through complicated networking menus. Windows 11 supports changing DNS through Settings, Command Prompt, or PowerShell, and all three methods take only a few steps.
Why Change DNS on Windows 11?
A DNS server translates domain names into IP addresses. Without DNS, browsers would not know how to locate websites like Google, YouTube, or Reddit.
Your internet provider automatically assigns DNS servers, but those servers are not always:
- fast
- stable
- privacy-focused
Changing DNS can help with:
- slow domain lookups
- DNS resolution failures
- unreliable browsing
- malware filtering
- encrypted DNS requests through DNS-over-HTTPS (DoH)
Changing DNS does not increase your actual internet bandwidth. What it can improve is DNS response time, which sometimes makes websites open faster.
Best DNS Servers for Windows 11
| Provider | Primary DNS | Secondary DNS | Best For |
|---|---|---|---|
| Cloudflare | 1.1.1.1 | 1.0.0.1 | Speed and privacy |
| Google Public DNS | 8.8.8.8 | 8.8.4.4 | Reliability |
| Quad9 | 9.9.9.9 | 149.112.112.112 | Malware blocking |
| OpenDNS | 208.67.222.222 | 208.67.220.220 | Content filtering |
| Cloudflare Family | 1.1.1.3 | 1.0.0.3 | Malware and adult filtering |
Cloudflare’s resolver is one of the most commonly recommended options because of low latency and strong privacy policies.
Method 1: How to Change DNS Server Windows 11 Using Settings
This is the easiest method for most users.
- Press Win + I to open Settings.
- Go to Network & Internet.
- Select your active connection:
- Wi-Fi
- Ethernet
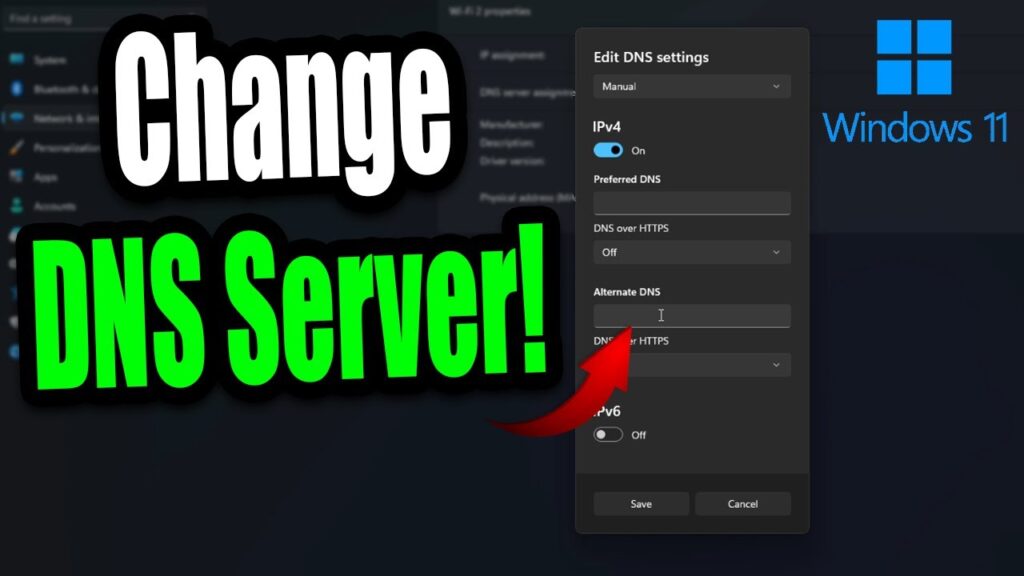
- Click Edit next to DNS server assignment.
- Change Automatic (DHCP) to Manual.
- Enable IPv4.
- Enter:
- Preferred DNS:
1.1.1.1 - Alternate DNS:
1.0.0.1
- Preferred DNS:
- Click Save.
Windows 11 also allows encrypted DNS requests using DNS-over-HTTPS. If supported by your provider, enable DoH from the same settings panel to prevent DNS traffic from being transmitted in plain text on the network.
Users searching for how to change DNS server Windows 11 usually start with this method because it requires no command-line tools and works on both Wi-Fi and Ethernet connections.
Method 2: Change DNS Server Using Command Prompt
Command Prompt is useful when troubleshooting remotely or configuring multiple systems quickly.
Open Command Prompt as Administrator and run:
netsh interface ip set dns "Ethernet" static 1.1.1.1
netsh interface ip add dns "Ethernet" 1.0.0.1 index=2
Replace "Ethernet" with the actual adapter name on your system. For wireless connections, the interface is often called "Wi-Fi".
To check available adapters:
netsh interface show interfacePeople looking for how to change DNS server Windows 11 through CMD often use this approach because it avoids navigating several Windows menus.
Method 3: Change DNS Server Windows 11 with PowerShell
PowerShell offers a cleaner and more modern way to manage networking settings.
Open PowerShell as Administrator and run:
Set-DnsClientServerAddress -InterfaceAlias "Ethernet" -ServerAddresses ("1.1.1.1","1.0.0.1")To confirm the change:
Get-DnsClientServerAddress -InterfaceAlias "Ethernet"To see the correct interface name:
Get-NetAdapterPowerShell is especially useful for automation, scripting, and enterprise environments where DNS settings need to be changed across multiple adapters or systems.
Common DNS Problems After Changing Servers
| Problem | Likely Cause | Fix |
|---|---|---|
| Websites stop loading | Incorrect DNS address | Re-enter valid DNS servers |
| Some apps connect, others fail | Old DNS cache | Run ipconfig /flushdns |
| DNS resets automatically | VPN or company policy | Disable VPN temporarily |
| Browsing still feels slow | ISP routing issue | Try another DNS provider |
| Certain websites fail | DNS filtering enabled | Use standard public DNS |
Sometimes users searching for how to change DNS server Windows 11 expect dramatic speed increases, but DNS changes only affect domain resolution. Problems like packet loss, unstable Wi-Fi, overloaded routers, or ISP congestion require different troubleshooting steps.
How to Verify DNS Changes Worked
After changing DNS settings, confirm Windows is actually using the new resolver.
Open Command Prompt and run:
ipconfig /allUnder your active network adapter, check the DNS Servers field.
You can also run:
nslookup google.comThe DNS server shown at the top should match the addresses you configured earlier.
Finally, clear the old DNS cache:
ipconfig /flushdnsThis forces Windows 11 to start using the new resolver immediately instead of relying on cached DNS records.
Reverting Back to Automatic DNS
To restore your ISP’s default DNS settings:
- Open Settings
- Go to Network & Internet
- Open your active connection
- Edit DNS server assignment
- Change Manual back to Automatic (DHCP)
That is all. No restart is normally required, because apparently even modern operating systems occasionally manage to change networking settings without demanding a ritual reboot sacrifice.
For most users searching for how to change DNS server Windows 11, Cloudflare and Google Public DNS remain the safest choices. Both are reliable, fast, widely supported, and easy to configure on home or business networks.